
The Best Methods to Unlock the iPhone Locked to Owner for Apple iPhone 14 Plus | Dr.fone
The Best Methods to Unlock the ‘iPhone Locked to Owner’ for Apple iPhone 14 Plus
Being locked out of your new iPhone can be a frustrating experience. It could be due to a forgotten passcode, a second-hand purchase with an activation lock, or any other reason. Facing the “iPhone Locked to Owner” scenario can be hard as the fault doesn’t lie with you. Regardless of the fact, finding a solution to unlock an “iPhone Locked to Owner“ can be a daunting task.
We bring you a comprehensive guide that explores the best methods to unlock an “iPhone Locked to Owner.” This article provides a detailed guide covering official and unofficial methods.
Part 1: A Brief Overview of the Functionality of Activation Lock
Activation Lock is a strong and innovative security feature introduced by Apple. This lock is available on Apple devices, including iPhones, iPads, and Macs. It is designed to prevent unauthorized access and use of a device in case it is lost, stolen, or misplaced. Here’s a brief overview of the features of Activation Lock:

Device Association
The Activation Lock works by associating a device with the iCloud account of the owner. When the Apple iPhone 14 Plus device is set up or restored, it prompts the user to sign in with their Apple ID and activates Activation Lock.
Activation Lock Status
Once enabled, Activation Lock securely stores the Apple iPhone 14 Plus device’s unique identifier (IMEI or serial number). It also stores the associated iCloud account details on Apple’s servers. This information is used to verify the Apple iPhone 14 Plus device’s status during activation and prevent unauthorized use.
Locking Mechanism
If a device with Activation Lock is lost or stolen, the owner can activate Lost Mode using the Find My app or iCloud website. Lost Mode remotely locks the Apple iPhone 14 Plus device, preventing anyone from accessing the user’s data. It also prevents device use without the owner’s Apple ID and password.
Device Recovery
In Lost Mode, the owner can provide contact information and display a custom message on the Apple iPhone 14 Plus device’s screen. These can help in facilitating its return. The device remains locked until the owner either unlocks it through iCloud or erases its data remotely.
iCloud Activation Lock Bypass
With Activation Lock, you get an added layer of security. This makes it challenging for unauthorized individuals to use a locked device. Apple’s servers confirm the Apple iPhone 14 Plus device’s activation status before allowing access to the OS. Thus, bypassing Activation Lock requires the original owner’s Apple ID and password.
Activation Lock on Used Devices
When purchasing a used Apple device, you should ensure that Activation Lock is disabled. Otherwise, the Apple iPhone 14 Plus device will remain locked to the previous owner’s iCloud account. Apple provides guidelines and procedures for sellers to remove Activation Lock.
Part 2: 5 Best Methods To Remove the Apple iPhone 14 Plus Locked to Owner Security
Having an iPhone locked to its previous owner’s security can be frustrating. That’s why finding effective methods to remove the lock is crucial. Luckily, various methods exist to bypass the Apple iPhone 14 Plus locked to the owner for free. Given below are the top 5 methods to resolve this issue:
Method 1: Use the Old iOS Passcode To Unlock the Apple iPhone 14 Plus device
If you’ve recently obtained a used iPhone, there is a possibility that the old iOS passcode might still be effective. When an iPhone is locked to its owner, you will find an option to unlock the Apple iPhone 14 Plus device using the passcode. It presents another viable option to remove the lock.
To proceed, you will need to contact the previous owner of the Apple iPhone 14 Plus device and request the passcode. Use the following guide after getting the old passcode of your Apple iPhone 14 Plus:
Step: Access your locked iPhone and tap “Unlock with Passcode.” On the following screen, enter the old passcode to remove the Activation Lock.


Method 2: Ask the Owner To Erase the Apple iPhone 14 Plus device Using iCloud
The passcode is not the only thing you can ask from the previous owner of the iPhone. You can also ask the previous owner to erase your device remotely. It can be helpful if the previous owner doesn’t remember the passcode or you are unable to meet them in person.
To make this procedure work, the owner will need to use the Find My Device feature from the iCloud website. Here is what the owner needs to do to resolve Activation Lock from your Apple iPhone 14 Plus:
- Step 1: Access the iCloud website on your computer’s browser and log in using Apple ID. Afterward, click the “Find My” option.
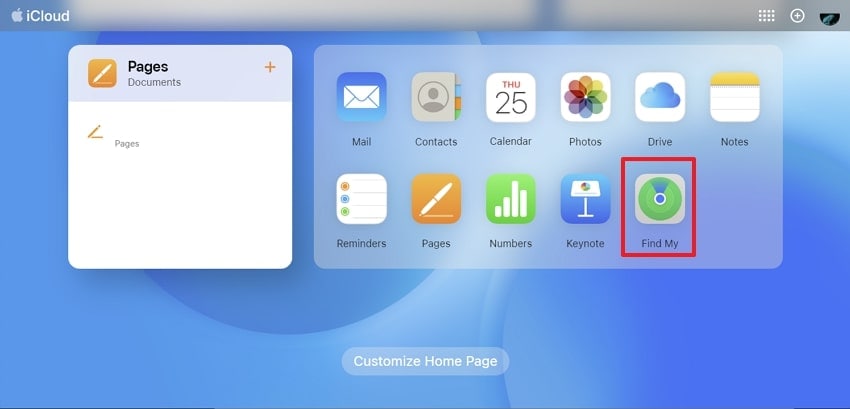
- Step 2: On the following screen, select your Apple iPhone 14 Plus from “All Devices.” Now choose “Erase iPhone” from the available options to erase the Apple iPhone 14 Plus device and remove the Activation Lock.

Method 3: Use the DNS Method To Unlock the Apple iPhone 14 Plus Locked to Owner
When you are unable to access the Apple iPhone 14 Plus device, the DNS method can be an alternative solution. This method involves changing the DNS settings on your Apple iPhone 14 Plus to bypass the activation lock screen. However, the procedure works only for devices running on older iOS versions.
The reason is that the process uses a loophole to allow you access to the Apple iPhone 14 Plus device. This loophole has now been patched by Apple. Given below is the detailed process to unlock your Apple iPhone 14 Plus Activation Lock:
Step 1: Power on your iDevice or restart it if your Apple iPhone 14 Plus is already powered on. Access your Apple iPhone 14 Plus Settings to tap “Wi-Fi” and navigate to the “Choose Wi-Fi Network” option.
Step 2: Select “More Wi-Fi Settings” using the “i” symbol next to the displayed Wi-Fi network. Here, choose “Configure DNS” and follow it by selecting the “Manual” option.
Step 3: Afterward, press “Add Server,” located under “DNS Servers.” Now enter the appropriate DNS server address based on your location:
For users in the United States/North America: 104.154.51.7
For users in Europe: 104.155.28.90
For users in Asia: 104.155.220.58
For users in the rest of the world: 78.109.17.60

- Step 4: Save the changes by selecting “Save.” Use the back arrow button to go back and choose “Ask to Join Networks.” Enter the network password and tap “Join.” Press the back arrow button when your Apple iPhone 14 Plus attempts to activate. Afterward, continue to set up your Apple iPhone 14 Plus.
Method 4: Take Help From the Online iCloud Activation Lock Removal Service
What to do if you have been unable to contact the previous owner and the DNS method isn’t working? The answer is you can also employ an online iCloud Activation removal service. These services charge you some money and unlock your Apple iPhone 14 Plus. All you need to provide them is your Apple iPhone 14 Plus IMEI number. The process is done remotely and takes 24 to 48 hours to complete.
Ensure your device IMEI is not blacklisted before sending it for the unlocking process. Described below are steps to use DirectUnlocks, an iCloud Activation removal service:
- Step 1: Use your computer’s browser to visit the official DriectUnlocks website. Enter your Apple iPhone 14 Plus’s IMEI number and select the Apple iPhone 14 Plus model in the provided box.
- Step 2: Once you have entered the details, tap “Remove Activation Lock.” Afterward, select a payment method to pay for the service. It will take up to 48 hours to unlock your device.

Method 5: Remove the iCloud Activation Lock With the Best Screen Unlock Tool – Wondershare Dr.Fone
Not having access to your purchased iPhone and no solution working to resolve the locked-to-owner iPhone issue can be disheartening. However, worrying is unnecessary as we have the best solution. To bypass the iCloud Activation lock, the best tool to use is Wondershare Dr.Fone. With this tool’s help, you can remove the lock and access your Apple iPhone 14 Plus without restrictions.
Aside from bypassing the iCloud Activation lock, it can also help you remove or bypass MDM. Furthermore, it also excels at unlocking iPhone screen locks. This tool has the ability to unlock all types of screen locks like a passcode, Touch ID, and Face ID.
Key Features of Wondershare Dr.Fone
- Wondershare Dr.Fone lets you remove the Screen Time Passcode without needing the actual password.
- With this tool, you can also remove your Apple ID from your Apple iPhone 14 Plus if you have forgotten the password.
- This tool can also remove SIM locks or carrier restrictions placed on the iPhone.
Steps To Remove the iCloud Activation Lock With Wondershare Dr.Fone
Removing the iCloud Activation Lock with Wondershare Dr.Fone is simple and fast. You don’t need any technical skills to unlock your Apple iPhone 14 Plus. Follow these steps to remove iCloud Activation Lock with Dr.Fone:
- Step 1: Choose iCloud Activation Lock Removal
After launching the Dr.Fone on your computer, move to “Screen Unlock” in the “Toolbox” tab. Here, choose “iOS” and click “iCloud Activation Lock Removal.” Now connect your locked Apple iPhone 14 Plus to the computer using a reliable USB cable.

- Step 2: Initiate the iCloud Activation Lock Removal Process
Afterward, tap “Start” to begin the iCloud Activation Lock bypassing process. You will first have to confirm whether your device is GSM or CDMA. If the Apple iPhone 14 Plus device is GSM, the unlocking process won’t harm it. However, you will lose calling or other cellular functions if it is CDMA.

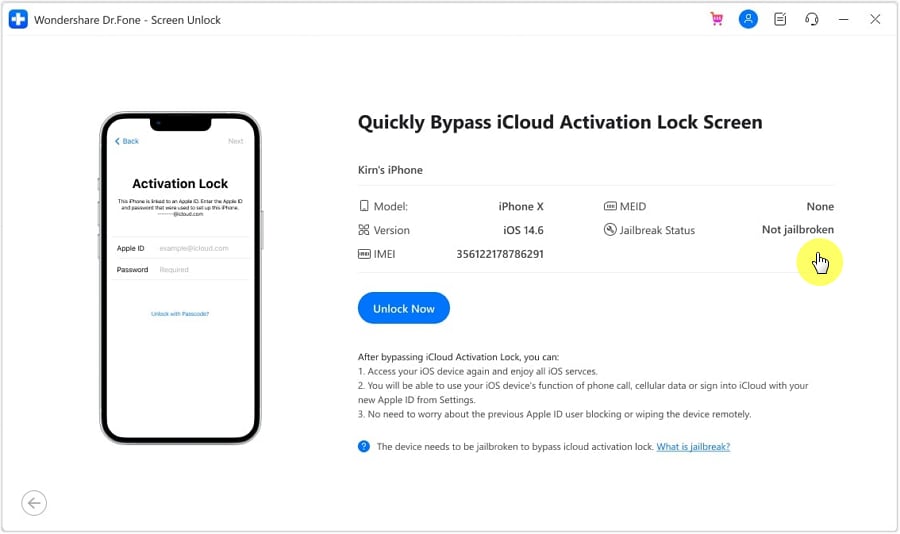
- Step 3: Bypass the iCloud Activation Lock Removal
After thoroughly considering the ramifications, tap “Unlock Now” to proceed. Now you will need to jailbreak your Apple iPhone 14 Plus, which you can do using the guides provided in the program. Once you have jailbroken your Apple iPhone 14 Plus, the iCloud Activation Lock bypassing process will start. Wait for the process to complete; once it does, tap “Done.”
Conclusion
To summarize, Wondershare Dr.Fone stands out as the best choice when it comes to unlocking an “iPhone Locked to Owner.” It has advanced features, a dynamic interface, and a proven track record. Wondershare Dr.Fone offers the most reliable and effective methods to regain access to your locked iPhone.
Wondershare Dr.Fone’s comprehensive toolkit provides a range of options to cater to different scenarios. Whether you’ve forgotten your passcode, purchased a second-hand iPhone with an activation lock , or encountered other locked-out situations, Wondershare Dr.Fone offers tailored solutions to meet your needs. Moreover, Wondershare Dr.Fone’s approach ensures a seamless and secure unlocking process.
How Do You Remove Restricted Mode on Apple iPhone 14 Plus
Restricted Mode on iPhone is useful for controlling access to certain content. If you need to remove these restrictions, learn how to disable Restricted Mode on your Apple iPhone 14 Plus by reading the article. The feature provides a layer of security and content filtering. However, it can limit functionality in some apps.
Follow the steps outlined in the page’s latter part to learn how to turn off Restricted Mode on your Apple iPhone 14 Plus. This will grant you unrestricted access to all apps and content, ensuring a smoother and more flexible user experience. To know more, let’s get started.

Part 1. What Is the iPhone’s Restricted Mode?
iPhone’s Restricted Mode is a comprehensive set of features to enhance user control in family-oriented contexts. It acts as a comprehensive filter, safeguarding users from unwanted content. Restricted Mode employs several key functionalities, such as:
- **Content filtering.**Content filtering filters out inappropriate content from various sources, including apps, websites, and search results.
- Functionality restrictions. Restricted Mode can also turn off specific functionalities like in-app purchases and the Apple iPhone 14 Plus device camera. It ensures a more controlled and secure user experience.
- **4-digit passcode.**The inclusion of a 4-digit passcode adds an extra layer of security. It prevents unauthorized changes to the Apple iPhone 14 Plus settings or Apple ID.
- **Parental controls.**Targeting family use, Restricted Mode incorporates robust parental controls. Parents can manage and monitor screen time for a balanced, age-appropriate digital experience for their children.

Part 2. Why Can’t I Remove Restricted Mode?
If you want to know how to remove Restricted Mode on your Apple iPhone 14 Plus, it’s not as simple as you may have desired. Here are several reasons:
- Forgotten Passcode
If you’ve forgotten the passcode set for Restricted Mode, unlocking it becomes challenging. Security measures are in place to prevent unauthorized changes, and bypassing it can be complex.
- Parental Controls
For users under parental guidance, restrictions are often set by parents or guardians. It’s to ensure a safe and controlled digital environment. Removing Restricted Mode might require parental consent or a passcode.
- Software Updates
Occasionally, issues arise during iOS updates, causing bugs or glitches that may affect the removal of Restricted Mode. These technical issues can hinder the smooth operation of device features.
- Factory Restrictions
In cases of secondhand or refurbished iPhones, the Apple iPhone 14 Plus device may have restrictions that limit the removal of Restricted Mode. These restrictions are set to maintain the Apple iPhone 14 Plus device’s integrity and compliance with certain standards.
These factors are crucial for users attempting to remove Restricted Mode. Each scenario may necessitate a different approach or solution.
Enabling Restricted Mode on your Apple iPhone 14 Plus is prudent, especially for parents. It ensures a secure and controlled digital environment for their children. Follow these simple steps to turn on Restricted Mode:
- Step 1: Go to Settings > Screen Time > Content & Privacy Restrictions on your Apple iPhone 14 Plus. Next, Toggle the switch next to Content & Privacy Restrictions to turn it on.

- Step 2: The device will prompt you to set a passcode. Choose a secure 4-digit code required to make changes or deactivate the Restricted Mode. You can customize various settings, such as app usage, web content, and privacy settings. Tailor these restrictions according to your preferences and the intended user.
Part 4. 3 Ways to Turning Off Restricted Mode on iPhone
If you want to know how to turn off Restricted Mode on your Apple iPhone 14 Plus, here are three efficient methods to do so. Whether on a specific iOS version or facing a forgotten passcode, these provide solutions for every scenario.
Method 1: Turn Off Restricted Mode on iOS 12 and Above
For users on iOS 12 and above, turning off Restricted Mode is straightforward:
- Step 1: Open the Settings app on your Apple iPhone 14 Plus and scroll down to find Screen Time > Content & Privacy Restrictions. Enter your passcode when prompted.

- Step 2: Toggle off the switch next to Content & Privacy Restrictions. This action turns off Restricted Mode on your Apple iPhone 14 Plus.
Method 2: Turn Off Restricted Mode on iOS 11 and Below
For those using iOS 11 and below, the steps are a bit different:
- Step 1: Go to Settings > General. Scroll down to find the Restrictions option.

- Step 2: Toggle off the switch next to Restrictions. The action turns off Restricted Mode on iOS 11 and below.
Method 3: Turn Off Restricted Mode Using Dr.Fone - Screen Unlock (iOS)
There may be situations where removing Restricted Mode on your Apple iPhone 14 Plus becomes challenging. If you can’t unlock your Apple iPhone 14 Plus screen time, then you need a specialized tool like Wondershare Dr.Fone. The platform’s Unlock Screen Time Passcode feature can assist in its removal in quick and easy steps.

Key features
Packed with essential features, Dr.Fone ensures a seamless experience in removing Restricted Mode your device:
- Removes all types of lock screens. Dr.Fone - Screen Unlock (iOS) is equipped to handle various lock screens. It provides a versatile solution for users dealing with Restricted Mode passcode issues.
- **No need for an Apple ID password.**Unlike many other tools, Dr.Fone allows you to unlock without Apple ID password. It streamlines the unlocking process, making it more accessible for users.
- **Unlocks Without Data Loss.**You regain access to your Apple iPhone 14 Plus without compromising your valuable information.
- High Success Rate: Dr.Fone - Screen Unlock (iOS) boasts a high success rate, assuring users of a reliable and effective solution.
How To Turn Off Restricted Mode Using Dr.Fone
Here’s how to disable Restricted Mode on iPhone without a password using Dr.Fone. Follow the steps:
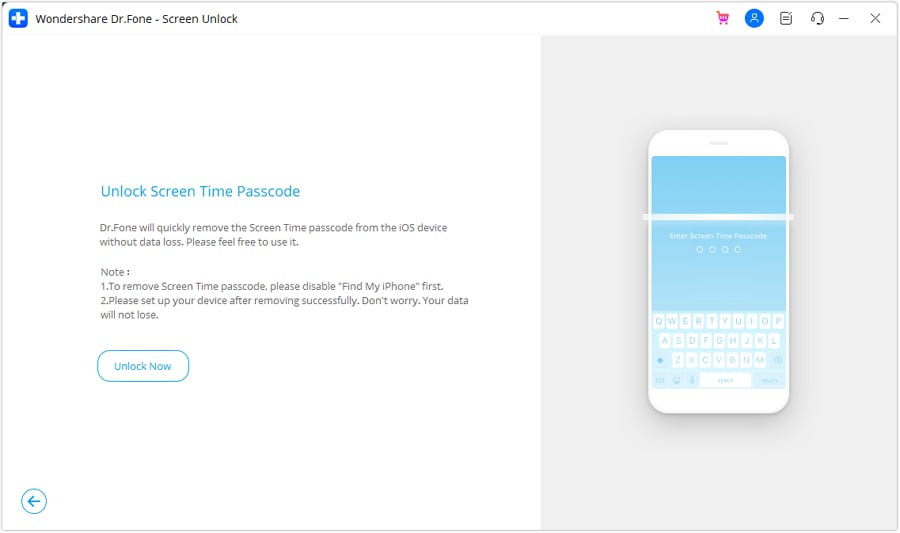
- Step 1: Begin by downloading and installing Dr.Fone on your computer. Next, click Toolbox > Screen Unlock > iOS. Choose Unlock Screen Time Passcode from the next window to start the process.

- Step 2: Ensure your Apple iPhone 14 Plus is connected to the computer using a USB cable. Wait for Dr.Fone to detect your Apple iPhone 14 Plus automatically. Next, click the Unlock Now button.
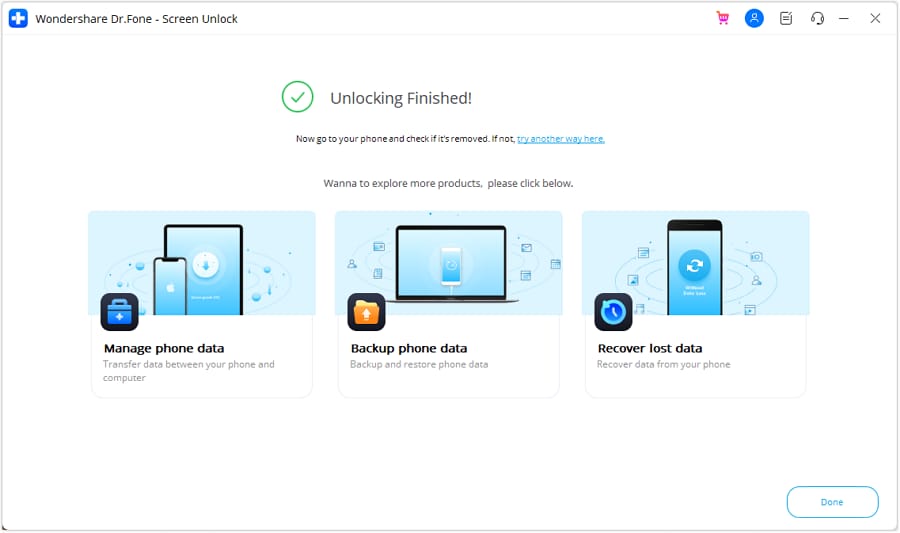
- Step 3: Follow the on-screen instructions. Afterward, Dr.Fone will initiate the unlocking process to remove the Restricted Mode passcode. Once removed, click the Done button to finish.
Tips: Are you searching for a powerful Screen Unlock tool? No worries as Dr.Fone is here to help you. Download it and start a seamless unlock experience!
Bonus. How To Turn Restricted Mode On or Off on YouTube
YouTube’s Restricted Mode on iPhone is valuable for users seeking a more controlled and family-friendly viewing experience. It serves to screen out mature content and ensures a safer environment, especially for younger audiences. Here’s a breakdown of what YouTube’s Restricted Mode does:
Screens Out Mature Content
Restricted Mode filters content that may not be suitable for all audiences, blocking videos with explicit or sensitive material.
Comment Viewing Restrictions
With Restricted Mode enabled, users cannot view comments on videos, offering an additional layer of protection and privacy.
Browser and Device Level Functionality
YouTube’s Restricted Mode operates on both the browser and device levels. Once activated, it applies across various platforms, ensuring consistent content filtering.
Different from Age-Restricting Videos
It’s important to note that Restricted Mode differs from age-restricting videos. While age restriction applies to specific videos, Restricted Mode filters content across the entire platform, providing a broader safety net.
How To Turn Restricted Mode On or Off on YouTube
Follow the steps to learn how to disable Restricted Mode on iPhone when using YouTube.
- Step 1: Go to your profile picture on the YouTube app and tap on Settings. Next, toggle the switch next to Restricted Mode on or off.

- Step 2: Go to the YouTube website if you’re on a browser. Next, scroll down to the bottom of the page and click on Restricted Mode. Toggle the switch on or off.
You May Also Like:
How to Turn Off Screen Time without Passcode
100% Working - Screen Time Passcode Not Working Solutions
Conclusion
Managing how to disable Restricted Mode on iPhone and YouTube ensures a safer digital environment. On iPhone, employ various methods like navigating settings or using Dr.Fone - Screen Unlock (iOS) for forgotten passcodes. On YouTube, easily toggle Restricted Mode in-app or on the browser for a more controlled viewing experience.
Remember, Dr.Fone becomes a valuable ally when facing a passcode challenge. These versatile solutions grant you control over content accessibility and privacy, enhancing your digital experience. You can easily navigate and customize your device’s restrictions by mastering these techniques.
Disabled Apple iPhone 14 Plus: How to Unlock a Disabled Apple iPhone 14 Plus?

Apple iPhone 14 Plus Disabled?
Because of using face masks, Face ID on iPhone does not always work correctly, and we are entering our passcodes more than before. If we enter it incorrectly a few times in succession, the phone will disable itself to prevent unauthorized access. It can seem like the end of the world because in so many ways smartphones have become our world. Here are ways you can unlock your Apple iPhone 14 Plus disabled due to too many incorrect passcode attempts.
Part 1: Unlock Disabled Apple iPhone 14 Plus Without iTunes/ iCloud Using Dr.Fone - Screen Unlock (iOS)
We know and understand that the word troubleshooting can remind you of long telephone calls with support or making appointments and driving down to specialists and spending obscene amounts of money to get solutions. You do not want that. How about a way you could unlock your Apple iPhone 14 Plus in a simple, 1-click way instead?
Dr.Fone - Screen Unlock is a unique tool designed to help you avoid all hassles and get back on track quickly. It comprises modules designed to help you with all the issues that you might encounter during smartphone use. Naturally, there is something to help you when your Apple iPhone 14 Plus is disabled. You don’t need to use anything else, no other software or special cable or support. All you need is this one software you can download on your computer (both macOS and Windows supported) and you’re good to go.
Dr.Fone - Screen Unlock (iOS)
Unlock Disabled Apple iPhone 14 Plus Without iTunes/ iCloud.
- Intuitive instructions to unlock iPhone without the passcode.
- Removes the iPhone’s lock screen whenever it is disabled.
- Easy to use with detailed guides.
- Compatible with the latest iOS/iPadOS version.
3981454 people have downloaded it
Do note that all methods that unlock your Apple iPhone 14 Plus will necessarily wipe your Apple iPhone 14 Plus and remove all data from the Apple iPhone 14 Plus device, essentially booting it up as new.
Step 1: Launch Dr.Fone and click the module titled “Screen Unlock”.
Step 2: Choose the “iOS” option, then select “Unlock iOS Screen” on the subsequent screen to continue unlocking your Apple iPhone 14 Plus.

Step 3: Follow the provided instructions to start the disabled Apple iPhone 14 Plus in Recovery Mode to unlock it. If for any reason the phone does not boot in Recovery Mode, there are instructions provided at the bottom to enter what is called DFU mode.

Step 4: Dr.Fone will read and display your phone model and the software installed on it. If the model displayed is incorrect, use the dropdown to pick the correct detail. Click “Start” to download the specific firmware file for your particular Apple iPhone 14 Plus model.

Step 5: After the download completes, please click Unlock Now to start unlocking the disabled Apple iPhone 14 Plus.

Your Apple iPhone 14 Plus will be unlocked in a short span of time. Please note that all data would have been wiped out from the Apple iPhone 14 Plus device. When you set the Apple iPhone 14 Plus device up again, if you set it to use iCloud, data such as Contacts, iCloud Photos, iCloud Drive data, etc. will be downloaded onto your device again. The apps you had on your Apple iPhone 14 Plus prior to it getting disabled can be downloaded again from the App Store. If you did not use iCloud but backed up the data manually, you will have to manually restore that data onto the Apple iPhone 14 Plus device again.
 safe & secure
Part 2: Unlock Disabled Apple iPhone 14 Plus Using iTunes or macOS Finder
Of course, there is an official way that Apple provides for users to restore device firmware using iTunes or macOS Finder. For this, iPhone is put under Recovery Mode manually and Finder or iTunes is used to reinstall software on it directly from Apple. This process is fine for people who are conversant in tech, since this process can throw up a lot of errors that are just numbers, and people can get confused as to what they mean, resulting in frustration.
Step 1: Connect your Apple iPhone 14 Plus to a Windows/ macOS device and launch iTunes. If you are on a Mac that runs macOS Catalina or higher, open Finder since you would not have access to iTunes anymore.
Step 2: Pick your Apple iPhone 14 Plus and do the following:
(2.1) Press the volume up button and let it go.
(2.2) Press the volume down button and let it go.
(2.3) Press the Side Button (power button, on the right side of your Apple iPhone 14 Plus) and keep it pressed till Finder or iTunes detects the phone in Recovery Mode.
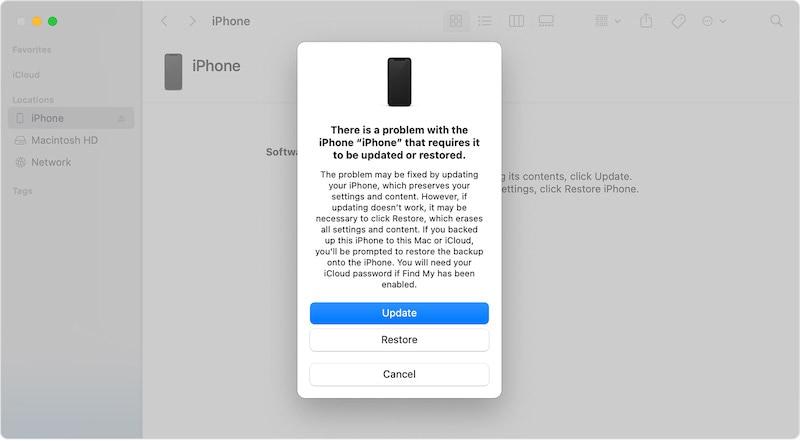
Step 3: Choose Restore to download and reinstall the latest iOS on your Apple iPhone 14 Plus and unlock your Apple iPhone 14 Plus.
When the Apple iPhone 14 Plus reboots, it will be reset to factory settings, and you can set it up again as you did when brand new.
Part 3: Unlock Disabled Apple iPhone 14 Plus Using iCloud Website (Find iPhone method)
Another method you may go with to unlock your disabled Apple iPhone 14 Plus is using the iCloud website to gain access back. This is a fairly easy way and doesn’t require going through complex hoops.
Find My is available both online via the iCloud website and on iOS devices and on Macs. In case the only Apple product you own is the currently disabled Apple iPhone 14 Plus, you can use Find My on the iCloud website from any other computer you may have to unlock your disabled Apple iPhone 14 Plus.
Step 1: Visit https://icloud.com and log in into the same iCloud account/ Apple ID as the disabled Apple iPhone 14 Plus.
Step 2: Go to Find My, select your Apple iPhone 14 Plus.
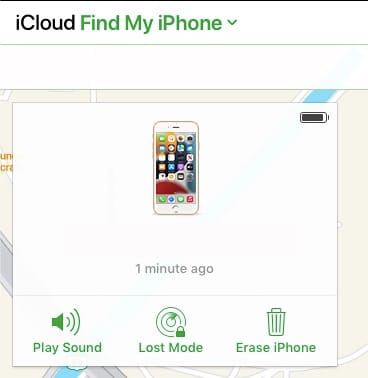
Step 3: Click Erase iPhone and confirm.
This will start the wipe process on your Apple iPhone 14 Plus remotely and your Apple iPhone 14 Plus will be reset to factory settings. You can now proceed to setup your Apple iPhone 14 Plus once again.
Part 4: Unlock Disabled Apple iPhone 14 Plus Using Find My iPhone App
There are times you have another iOS device in the family or just lying around, you can use that device to unlock your disabled Apple iPhone 14 Plus. This method is particularly useful if you’re traveling with family or alone, and only have family members with their own iOS devices or, say, your iPad with you. As always, note that all these methods will wipe your data from your Apple iPhone 14 Plus.
Step 1: Open the Find My app on your other iOS device or Mac
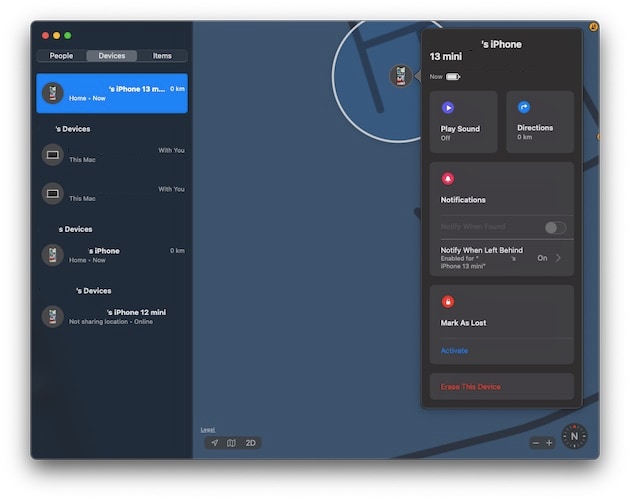
Step 2: Select your disabled Apple iPhone 14 Plus from the Apple iPhone 14 Plus devices from the left pane, click/ tap your disabled Apple iPhone 14 Plus and click/ tap Erase This Device
The disabled iPhone will be wiped and reset to factory settings. You can then set it up again.
Part 5: Unlock Disabled Apple iPhone 14 Plus Without A Computer
There are millions in the world who do not use the traditional computer so to speak. They have entered the post-PC era as they say, and their needs are met without a regular desktop or a laptop. They live wirelessly. They travel the world. Are you one of them? How would you unlock disabled Apple iPhone 14 Plus with no desktop/ laptop computer around? You have a few options.
You can use your other iOS device with Find My iPhone app to unlock your disabled Apple iPhone 14 Plus or you can use the iCloud website from your other device and Find iPhone app to unlock your disabled Apple iPhone 14 Plus.
The second option is to get a loaner device from someone you know. A loaner device is a device you borrow from someone to use for a purpose and return it when you are done with it. In this case, you can ask for a computer from someone you know and use it to unlock your disabled Apple iPhone 14 Plus and return the Apple iPhone 14 Plus device back. That way, you can use iTunes or macOS Finder if you’re more favorable to using that method.
When using a computer, the simplest, easiest, most flexible, and robust method to unlock disabled Apple iPhone 14 Plus is using third-party tools such as Dr.Fone – Screen Unlock (iOS). However, Dr.Fone is not just for troubleshooting and unlocking your disabled devices. Dr.Fone is like that multi-utility knife that can do a variety of things.
Using Dr.Fone you can not only unlock your Apple iPhone 14 Plus with ease, you can also use it periodically as a backup and restore tool that gives power in your hands. How does it do that? When you launched Dr.Fone, you had several modules to choose from and you chose Screen Unlock to unlock your disabled device. Instead of that, you can choose the Phone Backup module to backup and restore data from and to your device. Why would you use a third-party tool to backup and restore?
As you may be aware, using iTunes or macOS Finder allows you to backup and restore data onto your Apple iPhone 14 Plus easily, but, the one glaring omission here is that it does not allow you to choose what you want to backup and what you want to restore. This is a much-coveted feature that is glaringly absent from the Apple world so far, and with Dr.Fone’s iOS Phone Backup feature you can have that choice in your hands, just like you do with Android. Dr.Fone allows you to choose what you want to backup, so, you can back up just your photos, just your text messages, just your files, or any combination thereof, for the matter. And, when it comes to restore, you can restore selectively as well. So, suppose you backed up your entire data using Dr.Fone, now you can restore just the text messages if you so want.
safe & secure
Part 6: Prevent iPhone From Getting Disabled Again
After all this to get access back, you might think let’s go passcode-less and prevent the hassle. Don’t do that - that’s worse and unsafe. Instead, here are tips you can use to make sure you don’t accidentally disable your Apple iPhone 14 Plus again.
Tip 1: About Passcodes
- 1.1 Set a passcode that is easier to remember for you but difficult to think of for thieves and others.
- 1.2 Never use birthdates, years, vehicle numbers or any such numbers that may be easily tried by others.
- 1.3 Never use repeating numbers.
- 1.4 Do not use your ATM PIN as your phone passcode either. Think of some digits or combination that makes sense to you and only you. And then use it.
Tip 2: Use Face ID
Along with Passcode comes the option of Face ID on your Apple iPhone 14 Plus, so use that. That will minimize instances for you to enter your passcode, and may make you forget it again, though. So, make sure that the passcode you set does make sense to you and you can remember it always without effort.
Conclusion
Not all of us have the memory of elephants. With Touch ID and Face ID on our iPhones minimizing the use of passcodes, we may forget them. Another factor in forgetting passcodes is being too smart for our own good and trying to set up such a secure passcode that even we are not able to remember it. If we enter incorrect passcode too many times, the Apple iPhone 14 Plus disables itself and we need to restore it to factory settings to unlock it again. There are several ways to do that, depending on the time you are willing to spend on the job and your proficiency level, along with the resources that you have with you right now. For example, if a method requires use of another iOS device and you do not have it, that method is not useful to you right now, pick another. Lastly, when the Apple iPhone 14 Plus device is reset, instead of going passcode-less to make sure that you do not forget the passcode again, it is best to set up a passcode that you can somehow remember.
safe & secure
Also read:
- [New] In 2024, Leading the Charge in Sustainable Filmmaking
- [New] The Ultimate Guide to Professional Streaming on FB for 2024
- [Updated] In 2024, Pathfinding Your Way From AdSense to Accounts Aplenty
- Cómo Hacer Una Copia De Respaldo Perfecta De La Unidad C Con Windows 11 - Ejemplo Paso Por Paso
- Complete Guide For Apple iPhone 15 Pro Max Lock Screen | Dr.fone
- Decode and Defuse TFLA0002: Effective Strategies for Your Finals Crisis
- Full-Featured iCloud Drive in Sierra – Comprehensive Exploration for 2024
- Get Your Latest MSI Bluetooth Driver for Seamless Windows 11 and 10 Experience
- How to Unlock iPhone 12 Without Passcode? | Dr.fone
- In 2024, 4 Ways to Unlock iPhone X to Use USB Accessories Without Passcode | Dr.fone
- In 2024, How to Unlock iPhone 15 Plus without Passcode or Face ID | Dr.fone
- In 2024, Learn How To Lock Stolen Your Apple iPhone 11 Pro Properly | Dr.fone
- In 2024, Shake Up Your Streams Xplit-Alternatives Explored
- In 2024, Unlocking iPhone X Passcode without a Computer | Dr.fone
- In 2024, What Does Jailbreaking iPhone 14 Plus i Do? Get Answers here | Dr.fone
- Reset iTunes Backup Password Of Apple iPhone 13 Pro Prevention & Solution | Dr.fone
- Visual Verdict SJ6 Clash with Xiaomi’s Yi 4K Geniuses
- Title: The Best Methods to Unlock the iPhone Locked to Owner for Apple iPhone 14 Plus | Dr.fone
- Author: Amelia
- Created at : 2024-11-12 10:15:30
- Updated at : 2024-11-17 00:47:48
- Link: https://iphone-unlock.techidaily.com/the-best-methods-to-unlock-the-iphone-locked-to-owner-for-apple-iphone-14-plus-drfone-by-drfone-ios/
- License: This work is licensed under CC BY-NC-SA 4.0.