
Unlock Apple iPhone 14 Plus With Forgotten Passcode Different Methods You Can Try | Dr.fone
Unlock Apple iPhone 14 Plus With Forgotten Passcode: Different Methods You Can Try
Have you forgotten the passcode iPhone 6? We know forgetting your Apple iPhone 14 Plus passcode can be a frustrating experience, but luckily it is possible to unlock your device. Using different methods, we will show you how to unlock your Apple iPhone 14 Plus 6 with a forgotten passcode.
So let’s get started.
Top 3 Ways to Unlock iPhone 6 without Forgotten Passcode
Your iPhone passcode can be reset in a variety of ways, depending on whether you have a backup. Below, we’ll go over the three most common methods for resetting an iPhone passcode.
1. Use Find My iPhone
If you’ve activated Find My iPhone, you can use it to reset your passcode. Resetting your passcode this way is probably the simplest method, as it doesn’t require any technical knowledge or special tools.

Just follow the steps below and get started.
- Step 1: Via a computer or other iOS devices, go to icloud.com/find and sign in with your Apple ID and password.
- Step 2: Select “All Devices” at the top of the screen and find out your Apple iPhone 14 Plus from the list of devices.
- Step 3: Click “Erase iPhone” and confirm that you want to erase your device.
Once your Apple iPhone 14 Plus has been erased, it can be set up as a new device and you can choose a new passcode.
2. Unlock it via Recovery mode with iTunes
You can use Recovery mode to reset your device if you’ve synced your Apple iPhone 14 Plus with iTunes. This method will erase all of the data on your Apple iPhone 14 Plus, so confirm you have a backup before proceeding.

Just go with the steps below.
- Step 1: To begin with, you need to connect your Apple iPhone 14 Plus to a computer and turn on iTunes.
- Step 2: While your Apple iPhone 14 Plus is connected, restart it by pressing and holding the Sleep/Wake and Home buttons simultaneously. Keep holding these buttons until the recovery mode screen shows up.
- Step 3: When the “Restore” or “Update” appears, please choose “Restore”.
iTunes will now begin downloading the software for your device. Once it’s finished, you can set up your device as new and choose a new passcode.
3. Use Siri
If you’re running iOS 8 or later, you may be able to use Siri to bypass the lock screen. This method doesn’t work on all devices, and it can be patched with a software update, so it’s not a guaranteed way to reset your passcode.

Just follow the instructions.
- Step 1: Press and hold the Home button to activate Siri.
- Step 2: Say something like “Siri, what time is it?” or “Siri, who am I?”
- Step 3: Siri will likely respond with an error message saying that she can’t answer these questions while your device is locked. However, she will also give you the option to “Tap to open Clock”.
- Step 4: Tap on “Clock,” and you’ll be taken to the Clock app. From here, you can access other apps like Calendar, Reminders, and more.
While this method doesn’t give you direct access to the home screen, it does allow you to bypass the lock screen and access some of your device’s features.
Bonus Tips: Easy Tool to Unlock iPhone 6 without Passcode
If none of the above-mentioned methods works for you, or you don’t want to use them, there is another method that will surely work for you. Dr.Fone - Screen Unlock is a powerful software that can unlock your Apple iPhone 14 Plus without a passcode. The software is extremely easy to use and supports all iOS devices.
Dr.Fone - Screen Unlock (iOS)
Unlock iPhone Without Passcode
- Unlock Face ID, Touch ID, Apple ID without password.
- Bypass the iCloud activation lock without hassle.

- Remove iPhone carrier restrictions for unlimited usage.

- No tech knowledge required, Simple, click-through, process.
3,981,454 people have downloaded it
How To Unlock iPhone Without Passcode Using Dr.Fone?
Step 1: When you have Dr.Fone on your PC, then launch the program and select “Screen Unlock”.

Step 2: To connect your Apple iPhone 14 Plus to the computer, you require a USB cable.
Step 3: Follow the instructions below to put your device in DFU or Recovery mode.

Step 4: Once your device enters into DFU mode or Recovery mode, Dr.Fone will ask you to choose the right firmware for your Apple iPhone 14 Plus 6.
Step 5: Upon selecting the right firmware, Dr.Fone will start downloading the firmware for your device. Once it’s finished, click “Unlock Now” to remove the passcode.

You need to wait as the process may take several minutes. So be patient and don’t interrupt the process; otherwise, it may permanently damage your Apple iPhone 14 Plus. Once the process is completed, your Apple iPhone 14 Plus will be unlocked, and you can choose a new passcode.

This is a very easy-to-use way to reset your Apple iPhone 14 Plus passcode. So, if you’re looking for a hassle-free solution, this is the one you should obtain.
As we told you earlier, any method you follow will lose your data, as there is no way to unlock your Apple iPhone 14 Plus 6 without losing the data. So, how can you back up your Apple iPhone 14 Plus to avoid forgetting the passcode? Let’s find out.
How Can I Back Up My Apple iPhone 14 Plus to Avoid Forgetting Passcode Again?
Wondershare Dr.Fone is an excellent tool that can help you keep your Apple iPhone 14 Plus data to avoid losing it. The software is extremely easy to use and supports all iOS devices.
Step #1: Launch Dr.Fone App on Your Computer
Firstly, you need to download and install Dr.Fone on your computer. Once it’s installed, launch the program and select “Backup Device” from the main interface.

Step #2: Connect your Apple iPhone 14 Plus 6
Now you will need to connect your Apple iPhone 14 Plus 6 to the computer with a lightning cable and click “Back Up Now” to start backing up your device. Dr.Fone will now start scanning your Apple iPhone 14 Plus for data. Once it’s finished, you can move on to the next step.

Step #3: Hit Backup Button
Once it’s finished, you can safely disconnect your Apple iPhone 14 Plus and keep the backup file safe. So that is how you can safely back up your Apple iPhone 14 Plus without losing any data.
 safe & secure
FAQs
1. I forgot my iPhone passcode, and it’s disabled. How can I fix this?
If your Apple iPhone 14 Plus is disabled, restoring your device using above mentioned methods is the only way to fix it. However, this will erase all your data, so ensure you have a backup before proceeding.
2. How can I reset my iPhone if I forget my passcode without losing any data?
As we mentioned before, there is no way to reset your device without losing your data unless you have a backup. So, ensure you have a backup before proceeding with the reset process.
3. Can I unlock my iPhone 6 without a passcode?
You can unlock your Apple iPhone 14 Plus 6 without a passcode by following the steps mentioned in this article. However, this will erase all your data, so ensure you have a backup before proceeding.
4. I tried unlocking my iPhone using iTunes, but it’s not working. What should I do?
If you cannot unlock your Apple iPhone 14 Plus using iTunes, you can try Dr.Fone-Screen Unlock. This software is extremely easy to use and supports all iOS devices. Plus, it won’t erase your data if you have a backup.
Conclusion
We hope this article helped you reset your Apple iPhone 14 Plus if you forgot the passcode iPhone 6. As you can see, there are several ways to do it; however, any method you follow will result in data loss. So, ensure you have a backup before proceeding.
Also, if you’re looking for an easy and effective way to unlock your device, we recommend you try Dr.Fone - Screen Unlock (iOS) software. It’s extremely easy to use and supports all iOS devices. Plus, it won’t erase your data as long as you have a backup.
How to Make the Most of Your Apple iPhone 14 Plus Lock Screen with Notifications?
The Apple iPhone 14 Plus lock screen has certainly changed a lot over the last few updates of iOS. Not only it provides an added security to the Apple iPhone 14 Plus device, but with iPhone lock screen notifications, we can also save our time and efforts. With the introduction of iOS 18, we can also see a change in iPhone lock screen with notifications as well. To help you make the most out of lock screen notifications iPhone, we have come up with this ultimate guide. Read on and know all sorts of things you can do with iPhone notification lock screen.
Part 1: How to use iPhone lock screen notifications?
When it comes to iPhone lock screen with notifications, there are so many things that you can do. For instance, here are a handful of things you can do with iPhone lock screen notifications.
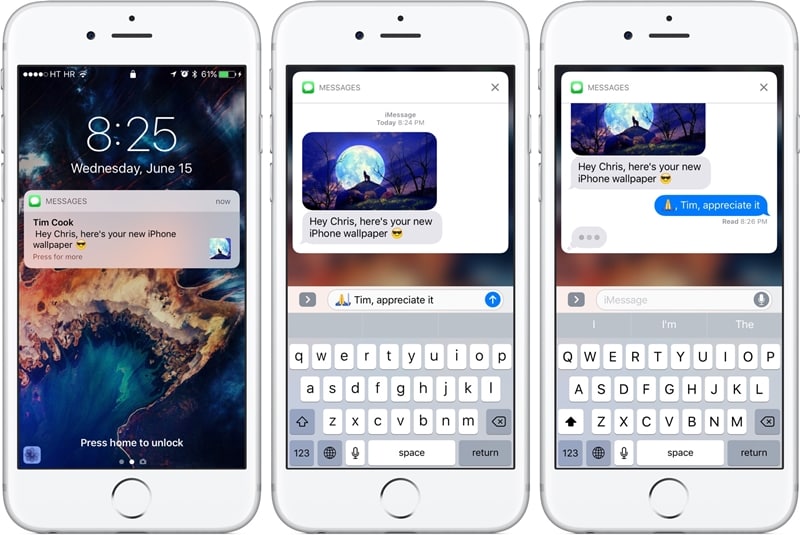
Reply to messages quickly
If you aren’t using this iPhone notification lock screen feature, then you are certainly missing out on something. You might already know that you can get a preview of messages on your home screen. Simply long press it (or 3D Touch) to interact with it. From here, you can reply to your messages without unlocking your device.
Interact with apps without unlocking your phone
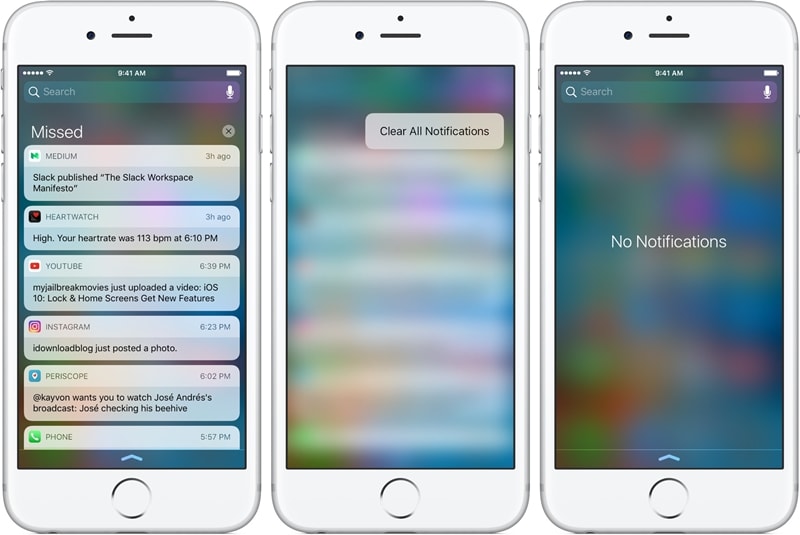
Not just your messages, you can interact with other apps as well right from the lock screen notifications iPhone. After getting a list of notifications, you can simply tap on the “x” button to close them.
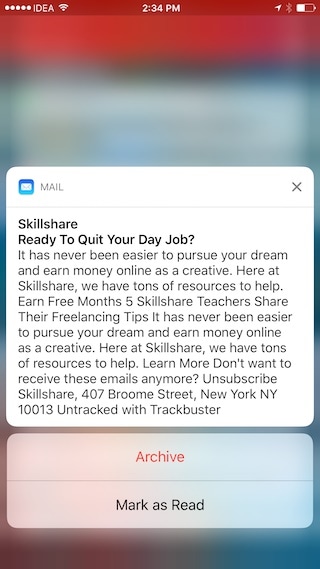
Though, if you want to know more, then just long press the notification. For instance, if you have got a notification for an email, then you can get various options just by long pressing it.
Search for anything
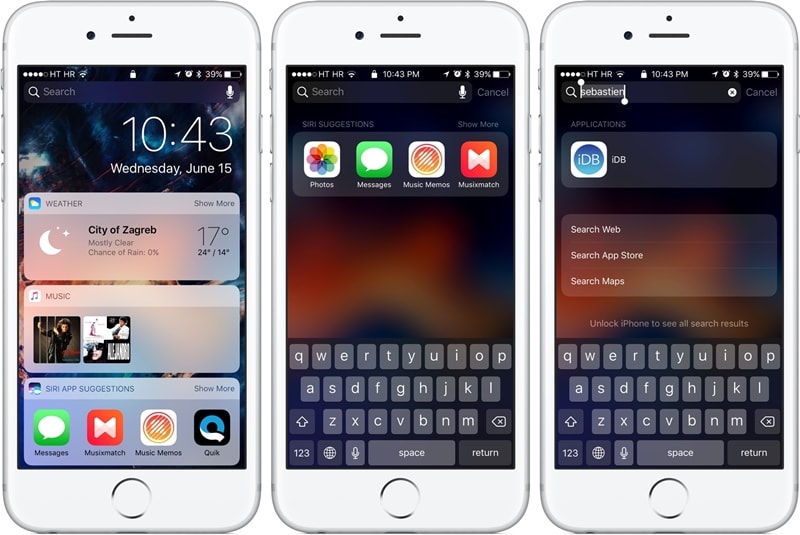
Besides interacting with widgets and apps, you can also search for something on your device and that too without unlocking it. Simply tap on the search bar to make it work.
Part 2: How to turn off notifications on iPhone lock screen?
Sometimes, people can access our private information just by looking at our notifications. In this way, they can get read your crucial information and that too without unlocking your device. By simply visiting your device’s settings, you can customize iPhone lock screen with notifications. In this way, you can turn on or off iPhone lock screen notifications for the apps of your choice.
1. Unlock your device and go to its Settings > Notifications to access all the features related to its notifications.
2. From here, you can view a list of all the apps that can access notifications.
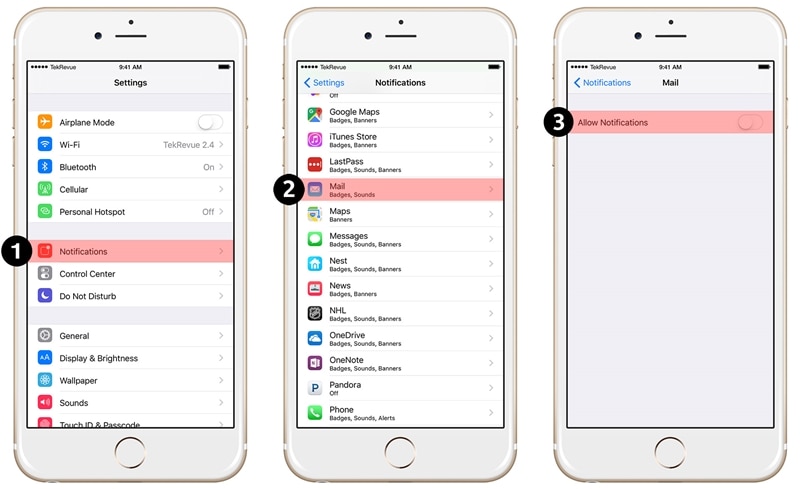
3. Simply tap on the app of your choice (Mail, Message, Photos, iTunes, etc).
4. From here, turn off the option of “Allow Notification” to completely turn off the notifications for the app.
5. If you simply want to turn off notifications on lock screen, then switch off the option of “Show on Lock Screen”.
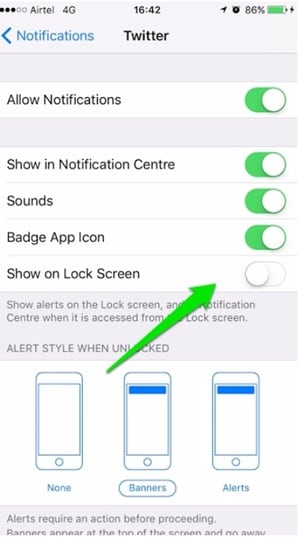
Besides that, there are a few other options as well that you can either enable or disable to customize your lock screen notifications iPhone.
Part 3: How to turn off notification view on iPhone lock screen?
The notification view can be used to see previous notifications on the Apple iPhone 14 Plus device without unlocking it. Needless to say, most of the users don’t like to include this iPhone notification lock screen feature. To turn off the notification view of iPhone lock screen notifications, follow these steps:
1. Firstly, unlock your device and got to its Settings > Touch ID & Passcode option.
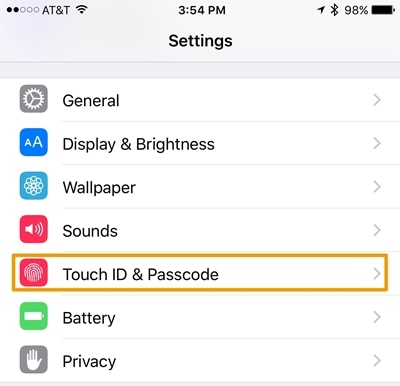
2. You would be needed to provide the passcode or your fingerprint in order to access these settings.
3. This will provide a list of features related to your passcode. Go to the section of “Allow Access When Locked”.
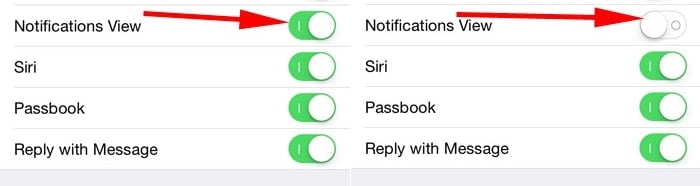
4. From here, make sure that the option of “Notification View” is turned off.
After turning the option off, you can exit from the Settings interface. In this way, your device won’t display the notification view.
Part 4: Changes on iPhone lock screen notifications on iOS 18
With the new update of iOS 18, we can see a drastic change in the Apple iPhone 14 Plus lock screen notifications as well. Since the Apple iPhone 14 Plus lock screen with notifications have been integrated into one, it becomes quite easier for users to access it.
Access iPhone notification lock screen on iOS 18
Some people find it a little tricky to access the lock screen notifications iPhone after the iOS 18 update. Instead of sliding the screen from the top, you need to swipe it from the middle. By swiping it from the bottom, you might get its control center.
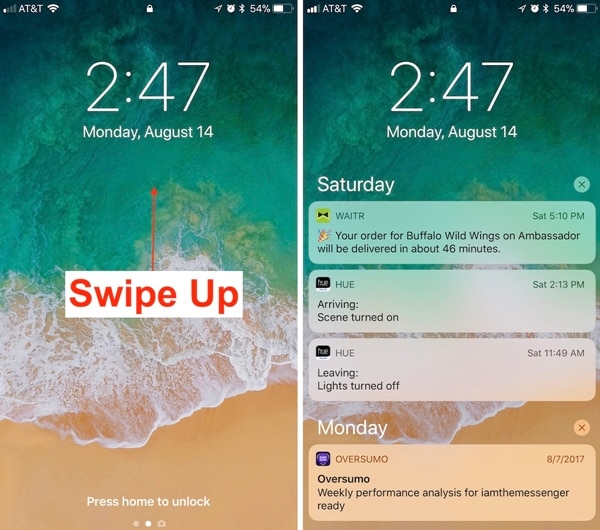
Simply swipe up from the middle of the screen to get a list of all the notifications. Now, you can slide them to access the old notifications.
Nevertheless, you can swipe from the top to access the cover sheet.
Swipe left or right
This is undoubtedly one of the most evident new features of the Apple iPhone 14 Plus notification lock screen of iOS 18. Now, you can swipe left or right to access various features. By swiping left, you can access the Camera on your device and by swiping right, you can access your Today View.
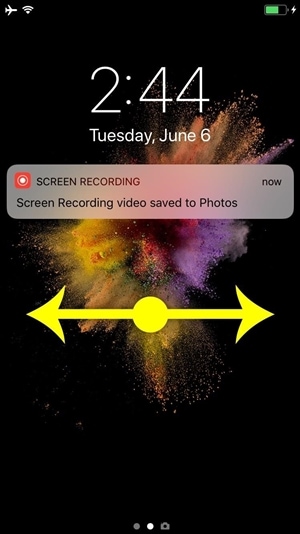
If you want to click pictures instantly, then simply swipe left the lock screen. This will launch the Camera on your device, letting you click pictures on the go. Similarly, by swiping right, you can access your Today View. This includes vital data from apps and widgets that your smartphone assumes is important for you regarding the day.
We hope that after following this guide, you would be able to gain in-depth information regarding iPhone lock screen with notifications. Apart from all the basic things you can do on the lock screen, we have also provided easy ways to customize it. Furthermore, there are so many things that you can do with the iOS 18 iPhone lock screen notifications. While most of the users loved the feature, some are quite hesitant about its application. What is your take on this? Let us know about it in the comments.
3 Ways to Erase Apple iPhone 14 Plus When It’s Locked Within Seconds
Over the last few years, Apple has made remarkable progress with its flagship iPhone series. There are plenty of ways for users to back up, erase, and restore their data. It doesn’t matter if you are moving from one device to another or would like to reset your phone. You should know how to erase iPhone when locked. Too many times, after getting locked out of their device, users find it hard to wipe locked iPhone. If you are also going through the same dilemma, then don’t worry. Read on and learn how to wipe a locked iPhone in this extensive guide.
Part 1: Erase locked iPhone with Dr.Fone - Screen Unlock (iOS)
One of the best ways to wipe locked iPhone is by using Dr.Fone - Screen Unlock (iOS) tool. It is an extremely secure and reliable application. It is already compatible with every leading version of iOS and runs on almost all major iOS devices. Available for both Windows and Mac, the tool can be used to remove activation lock and Apple ID. The tool also provides an easy-to-use interface that can help you reset the activation lock on your device.
Dr.Fone - Screen Unlock (iOS)
Erase the data of an iPhone even if it is locked
- Erase iPhone data together with the lock screen.
- Remove the 4-digit/6-digit passcode, Touch ID, and Face ID , and activation lock.
- A few clicks and the iOS lock screen are gone.
- Fully compatible with all iDevice models and iOS versions.
4,395,216 people have downloaded it
To learn how to erase iPhone when locked, follow these steps:
Step 1. Download and install Dr.Fone.
Start by downloading Dr.Fone - Screen Unlock (iOS) from its official website. Install it on your Windows or Mac and connect your Apple iPhone 14 Plus to the system whenever you wish to resolve an issue with it. After launching the application, click on the “Screen Unlock” option from the welcome screen.

Step 2. Click Start button.
Wait for a while as the application will automatically recognize your phone. Click on the “Start” button to commence the process.

Step 3. Put the phone into DFU mode.
Follow the on-screen instructions to put your phone into the DFU (Device Firmware Update) mode. It can be done by pressing the Home and Power button simultaneously for 10 seconds. Afterward, it would help if you released the Power button while pressing the Home button for another 5 seconds.

Step 4. Download firmware package.
After putting your device into the DFU mode, the application will automatically move to the next window. Here, you would be required to provide essential information related to your phone like device model, firmware update, and more. After filling in the correct information, click on the “Download” button.

Sit back and relax as the application will download the essential firmware update for your phone.

Step 5. Start to unlock.
Once it is done, the application will automatically start resolving the issue on your phone. Make sure that you don’t disconnect your phone while Dr.Fone - Screen Unlock (iOS) will resolve the issue on your device.

Step 7. Unlock completed.
After completing the operation successfully, the interface will provide the following message.

You can check if you can unlock your phone or not. If you still have an issue, then click on the “Try Again” button. Else, you can safely remove your phone and use it without any constraint. By following this method, you would learn how to wipe a locked iPhone with Dr.Fone - Screen Unlock (iOS).
One of the best things about this technique is that you would wipe locked iPhone without causing any damage. Since it is a secure and reliable method with a high success rate, it is sure to provide a hassle-free experience.
Part 2: Erase locked iPhone by restoring it with iTunes
If you are looking for an alternative way to learn how to erase iPhone when locked, you can also take the assistance of iTunes. It provides a free and simple method to restore your device. Since it would wipe your data, you might end up losing your essential files in the process. We recommend following this technique only when you have taken a backup of your data via iTunes beforehand. To learn how to wipe a locked iPhone with iTunes, follow these steps:
1. Firstly, put your Apple iPhone 14 Plus into recovery mode. To do this, launch an updated version of iTunes on your system and connect it to a lightning cable. Now, long-press the Home button on your device and connect it to the other end of the lightning cable. Release the Home button once the iTunes logo would appear.

2. As soon as your phone would be connected, iTunes will recognize an issue with it. From here, you can choose to restore it.

3. If you don’t get the above pop-up on your screen, launch iTunes and visit its “Summary” section. From here, choose “Restore backup” under the Backup section.

4. agree to the pop-up message by clicking on the “Restore” button.

Part 3: Erase locked iPhone by Find My iPhone
If you haven’t already taken a backup of your phone, then you might find it hard to recover it with iTunes. Another popular way to wipe locked iPhone is by using the Find My iPhone tool. This is mostly implemented in case of a stolen or lost device. One of the best features of Find My iPhone is that it can be used to reset your device remotely. With this, you can protect your personal data without much trouble. Implement these steps to learn how to erase iPhone when locked using Find My iPhone.
1. To start with, log in to your iCloud account and visit the “Find My iPhone” section.
2. Under the “All Devices” section, you can choose the Apple iPhone 14 Plus you wish to reset.

3. After selecting your device, you will be presented with various options. Select the “Erase iPhone” feature to reset your device.

Confirm your choice and wipe locked iPhone remotely using the Find My iPhone feature on iCloud.
After following this informative guide, you would learn how to wipe a locked iPhone without any trouble. Go ahead and pick your preferred option to wipe locked iPhone. We recommend using Dr.Fone - Screen Unlock (iOS) to resolve this issue securely. Though, if you wish to do it remotely, then you can also give Find My iPhone a try as well. If you are familiar with any other reliable method, please let us know how to erase iPhone when locked in the comments below.
Also read:
- [New] Supercharge Your Content Innovative YouTube SEO Tools to Use
- 2024 Approved Making Waves in the Social Media World via FB
- Crafting a List of Unique, Charming Indie Games
- Disabling iPhone XR Parental Restrictions With/Without Password | Dr.fone
- How To Get Out of Recovery on iPhone XR? | Dr.fone
- How To Unlock Apple iPhone XS Max Without Swiping Up? 6 Ways | Dr.fone
- How to Unlock iPhone 15 Pro Max Without Passcode? | Dr.fone
- Introducing the Ultimate Intro Edits App of 2023 for 2024
- Locked Out of Apple iPhone 13 mini? 5 Ways to get into a Locked Apple iPhone 13 mini | Dr.fone
- Title: Unlock Apple iPhone 14 Plus With Forgotten Passcode Different Methods You Can Try | Dr.fone
- Author: Amelia
- Created at : 2024-11-12 20:44:30
- Updated at : 2024-11-16 19:57:05
- Link: https://iphone-unlock.techidaily.com/unlock-apple-iphone-14-plus-with-forgotten-passcode-different-methods-you-can-try-drfone-by-drfone-ios/
- License: This work is licensed under CC BY-NC-SA 4.0.