
Unlocking Apple iPhone 11 Pro Lock Screen 3 Foolproof Methods that Actually Work | Dr.fone
Unlocking Apple iPhone 11 Pro Lock Screen: 3 Foolproof Methods that Actually Work

The competition in the market between Android and iOS has been increased ever since the features are increasing. People get attracted by anything that is new and unique. The competitive brands are taking things seriously and are coming up with the eye-catching mobile body and mesmerizing features.
Someone who is new in the Apple world must not be aware of the security activation lock and many other different features. No one can use your Apple device without the activation lock. The fact that user can remove all the data from iPhone whenever they want and can even restore it instantly gets user attention.
Looking more into the Apple iPhone 11 Pro world, people might be confused between the lock screen and activation lock. Also, they might be facing the problem of how to bypass the lock screen of iPhone Apple iPhone 11 Pro . Let us answer your questions and provide you some knowledge.
Part 1. Can Someone Bypass the Apple iPhone 11 Pro Activation Lock?
Protecting user’s information is among the core objectives of Apple. For this purpose, an activation lock has been developed for iPhone, iPad, iPod, and Apple Watch users. The lock prevents any other person from using your apple device in case it’s lost or stolen.
The phones that are iOS 7 or above versions do not need to manually enable the lock because it is auto-enabled once the phone is switched on. The strong security concerns behind this lock do not allow your device’s misuse from someone who is using it for the wrong purpose.
Apple’s activation server saves your Apple ID, and in case the phone is turned off, or any erasing activity is observed, then the Apple iPhone 11 Pro device will ask to unlock the iCloud activation. Suppose you have purchased a phone from someone, and it asks for an activation lock. That is because the Apple iPhone 11 Pro device is still linked with the old owner and hence, will not allow you to access the phone.
For this, if the Apple iPhone 11 Pro device is asking for an activation lock, the user cannot bypass the Apple iPhone 11 Pro activation lock. The only way to get rid of that is to break the link between the Apple device and the prior owner, but that requires Apple ID.
Part 2. Bypass iPhone Lock Screen Apple iPhone 11 Pro without Passcode [No iTunes]
The major difference between the lock screen and activation lock is that the lock screen can be bypassed without the password but, the user can never bypass the activation lock as it marks the security boundary of Apple.
You might be wondering how to escape the lock screen without a password because it is possible that you might forget the password, and now you can’t open your phone. Let’s look at how you can do this;
The commonly faced problem of many iOS users was that they forget the password but later, an amazing solution to this problem as Dr.Fone – Screen Unlock application was known and used by almost all iOS users. Some of its features are;
- The application is easy to use. It does not need any technical skill to use it, and everyone can handle the application.
- It can unlock a disabled iPhone even if the user doesn’t have the passcode.
- It fully supports iPhone 8, iPhone X, and all the latest models of iPhone.
- You don’t have to worry if you got a second-hand phone because Dr.Fone can unlock it.
Let us now show you how to use the application and enjoy life with iPhone;
Step 1: Download Dr.Fone
The user is requested to download Dr.Fone – Screen Unlock on Windows or Mac system from its official website. Once it’s downloaded, you should install it and then, it will be ready to use. Launch it whenever you want to bypass the Apple iPhone 11 Pro lock screen.
As you will launch the application, the home page will appear from that, and you have to select ‘Screen Unlock’ that is on the left.

Step 2: Make a Connection
The user is now supposed to make the connection between iPhone and the system and let the application automatically detect it. When you are ready to initiate the action, just click on the button ‘Unlock iOS Screen.’

Step 3: Activate DFU Mode
Once the system has detected the phone, the user is advised to activate the DFU mode by turning off the phone and connecting it to the computer.

Step 4: Information for Confirmation
The next window will ask for some basic information regarding the iOS device and version.

Step 5: Firmware Update
Click on the ‘Download’ button at the bottom to get the firmware update for your phone. This might take some time as the firmware update for your phone is being downloaded. As that’s done, click on the ‘Unlock Now’ button on the screen.
Step 3: Select the Path
Select the saving path where you want to save your screenshots. For this, click on the “Settings” and go to “Screenshots and recording settings.”
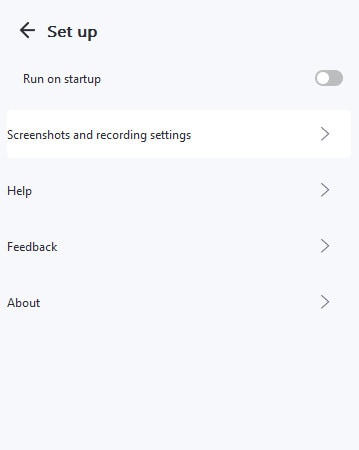
You will see the option “Save to.” Guide the path, and all taken screenshots will be stored at the selected location.

Provide the system with an on-screen confirmation code to continue the process. When that is done, the interface will notify you. By clicking on the ‘Try Again’ button, you can repeat the process.

Part 3. Erase iPhone from iCloud [Apple ID & Password]
People keep on switching between Android and iOS. Not everyone sticks to one thing, and so do passionate mobile users do. But suppose someone is changing their phone and they want to delete the Apple iPhone 11 Pro from iCloud, both the Apple ID and its password; what should be done in such a scenario?
The user can easily bypass the lock screen on their iPhone from iCloud only if their Find My iPhone feature is turned on. Let us take you through the steps that will help you to do the task;
User is firstly supposed to log in to iCloud.com on their computer or any other device in use by using the Apple ID and password.

In case the user has enabled the two-factor authentication on iPhone, then they should hit ‘Trust’ and enter the six-digit verification code sent to their iPhones on the iCloud web.
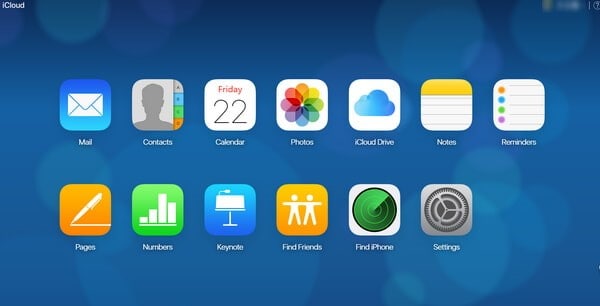
Once that is done, and you have logged in to iCloud, select the option of ‘Find iPhone.’
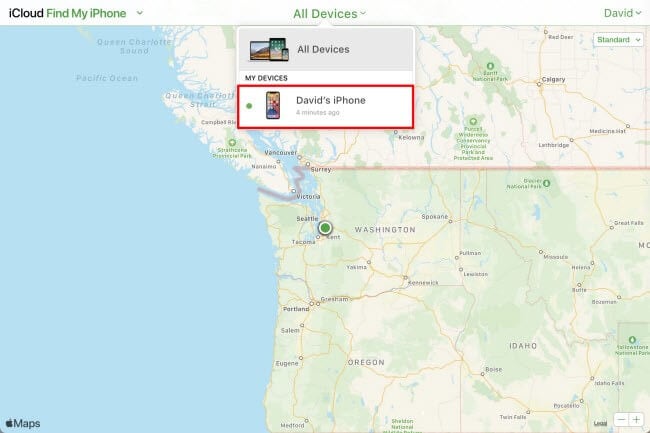
Now, the user should select and click on ‘All Devices, located at the top of the browser.
The system will now ask for your Apple ID and password; provide that.
After you have done that, a list of all the Apple iPhone 11 Pro devices will appear. You are now supposed to select your device and click on the option of ‘Erase iPhone.’
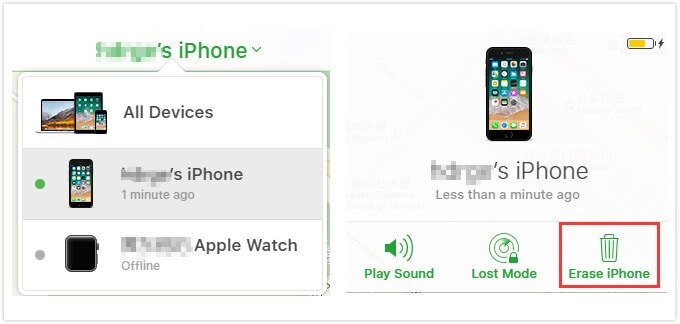
- Doing this will wipe all the data, settings and, also the password.
Part 4. Restore Apple iPhone 11 Pro Apple iPhone 11 Pro to Factory Reset by iTunes
Most iPhone users have synced the Apple device to iTunes. This helps them to recover the data in case it is lost. If the user has created an appropriate backup across iTunes, they can easily carry out the process of bypassing the lock screen. In other words, iPhone users have everything saved without the fear of being lost.
iPhone users can even restore their phones to factory settings without losing anything and by just using iTunes. Let us show you how it is done;
Users should start the process by turning their phone off and connecting it to the computer.
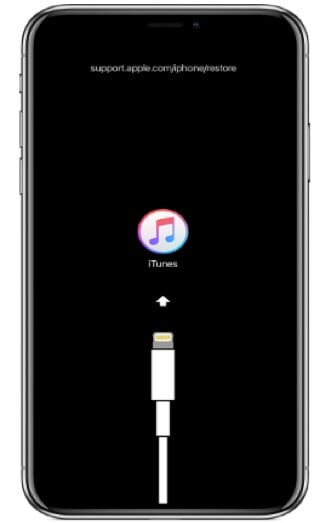
Now, the user should press and hold the ‘Home’ button and ‘Power’ button together. Release them when you see ‘Connect to iTunes’ on the screen.
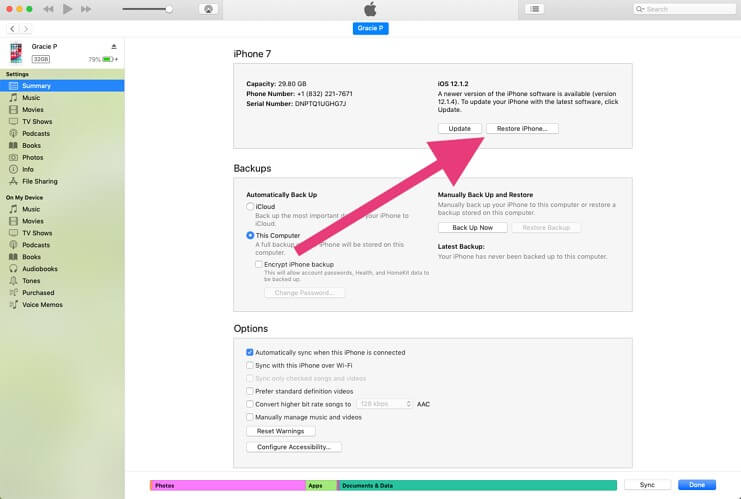
Once that is done, the user is now requested that from the menu on the left side of the screen, select ‘Summary.’
A new window will appear, the Summary window. From this, the user is supposed to select the option of ‘Restore iPhone.’
Selecting the restore option, a confirmation window will appear on the screen, asking the user to confirm the decision of the restore process.
As soon as iTunes has finished the restoring process, the phone is ready and reset.

Users can now retrieve all the data that has been backed up on iTunes.
Conclusion
The article has covered a sufficient portion of knowledge for the user regarding how they can bypass iPhone lock screen Apple iPhone 11 Pro . The difference between the common confusion of lock screen and activation screen and also a few tips and tricks have been discussed.
How to Turn Off Find My Apple iPhone 11 Pro when Phone is Broken?
In today’s world, your phone is your most important asset. Especially when you own an iPhone, you’re much more careful because it is pretty expensive than normal phones. You’re always making sure to keep it safe and secure, but Apple has ways to keep you away from this hassle.
Apple ensures the privacy and security of its customers. For that, it has introduced this excellent feature of Find My iPhone, which keeps track of the location of your device no matter in which part of the world you are. So, if you’ve lost your Apple iPhone 11 Pro or it is stolen, this app is your savior.
Downloading and enabling Find My iPhone can be really easy and cinch but turning it off can be an arduous task. But we have you covered through this article that shall tell you about this app in detail and guide you on how to turn off Find My iPhone even when your Apple iPhone 11 Pro is broken.
Part 1: What is Find My iPhone?
Find My iPhone is an application forged by Apple that keeps track of your Apple iPhone 11 Pro’s location protects your data. Once you enable this application, it requires your iCloud password to unlock your phone to keep your Apple iPhone 11 Pro safe from the wrong hands. This application comes in handy when you accidentally lose or misplace your phone.
The best part about this application is that it is free of cost. It usually comes built-in your Apple iPhone 11 Pro already, but if not, you can easily download it from the app store. Sign in with your Apple ID, and it will automatically locate your Apple iPhone 11 Pro no matter where you go.
Part 2: Efficient Way of Turning Off Find My iPhone Within Second- Dr. Fone
Dr.Fone - Screen Unlock is an excellent data recovery and management software created by Wondershare. However, limiting it to just recovery and management of data will not be just as it offers much more than just that. Transferring files, repairing the operating system, changing the GPS location, and fixing the activation lock are its amazing services.
Dr.Fone - Screen Unlock (iOS)
Turning Off Find My iPhone Within Second.
- Maintains the security of your data and keeps it in its original form.
- Recovers your data from damaged or broken devices.
- Erase’s data in such a way that no other software can recover it.
- Has great integration with iOS and macOS.
3981454 people have downloaded it
Dr.Fone can also be a great solution for how to turn off Find My iPhone when your Apple iPhone 11 Pro is broken.
Step 1: Install Dr. Fone
Launch Wondershare Dr.Fone on your computer and connect your Apple iPhone 11 Pro with it via cable.
Step 2: Unlock Apple ID
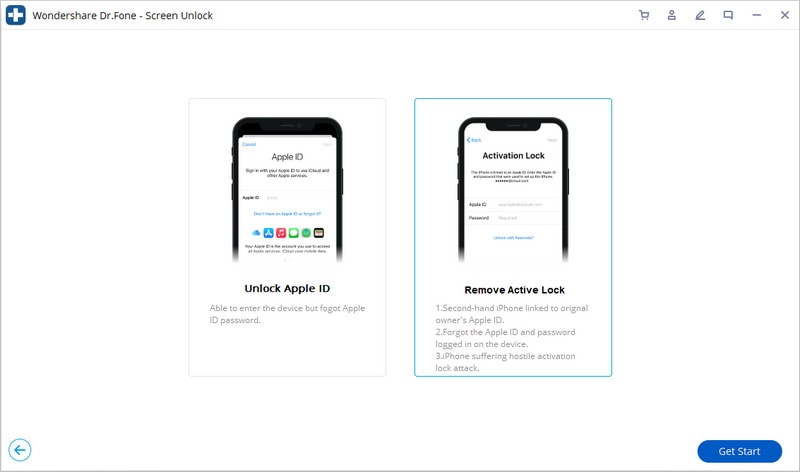
Open Wondershare Dr.Fone and select “Screen Unlock” among the other options on the home interface. Now another interface will appear displaying four options. Click on “Unlock Apple ID.”
Step 3: Remove Active Lock
After choosing the “Unlock Apple ID” option, an interface will be displayed that will show another two options, out of which you have to select “Remove Active Lock” to proceed further.
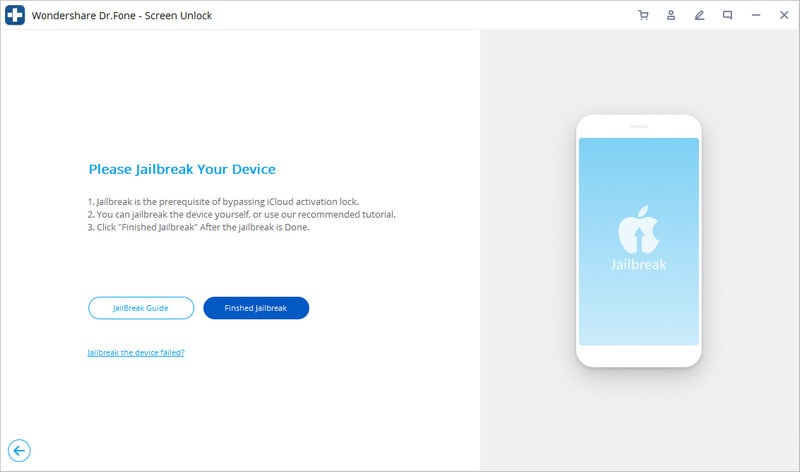
Step 4: Jailbreak your Apple iPhone 11 Pro
Jailbreak your Apple iPhone 11 Pro by following the instructions given by the system. Once you complete them, click on “Finish Jailbreak.”
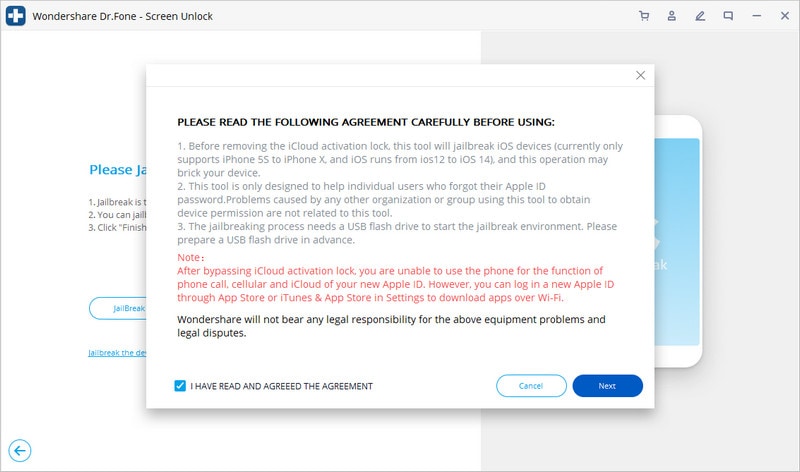
Step 5: Confirmation Window
A warning will be displayed on the screen asking for confirmation to remove the active lock. Then again, another confirmation message will pop up confirming the model of your device.
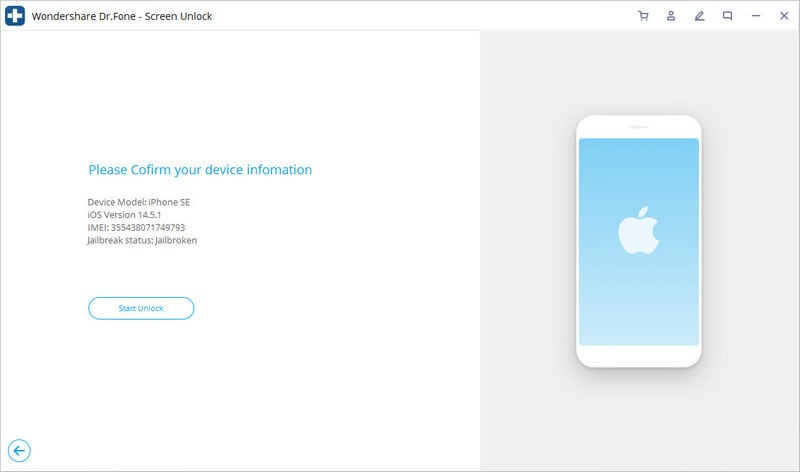
Step 6: Unlock your Apple iPhone 11 Pro
Click on “Start Unlock” to proceed. Once the process is started, you have to wait for a moment until the activation lock is successfully removed.
Step 7: Turn off Find My iPhone
As your activation lock is removed, go to the settings and remove your Apple ID. Consequently, Find My iPhone will be disabled.

Part 3: How to Turn Off Find My iPhone on Broken iPhone Using iCloud?
iCloud is the most secure storage drive introduced by Apple. It keeps your gallery, your reminders, contacts, and your messages up to date. Moreover, it also organizes and stores your files while keeping them private and secure. iCloud strongly integrates your Apple iPhone 11 Pro with other iOS devices so you can share your data, documents, and location with other iCloud users.
As mentioned earlier, turning off Find My iPhone can be very complex. But if your Apple iPhone 11 Pro is damaged in some way, turning it off can be much more stressful. Here, iCloud can come to the rescue as it’s the most effective solution for how to turn off Find My iPhone when your phone is broken.
Here we have explained to you step by step how to turn off Find My iPhone on broken iPhone using iCloud:
Step 1: Go to the official website of iCloud.com and enter your credentials to sign in with your Apple ID.
Step 2: Click on the “Find My iPhone” icon at the end of the page. The app will start locating your device, but as your Apple iPhone 11 Pro is damaged, it might not find anything.

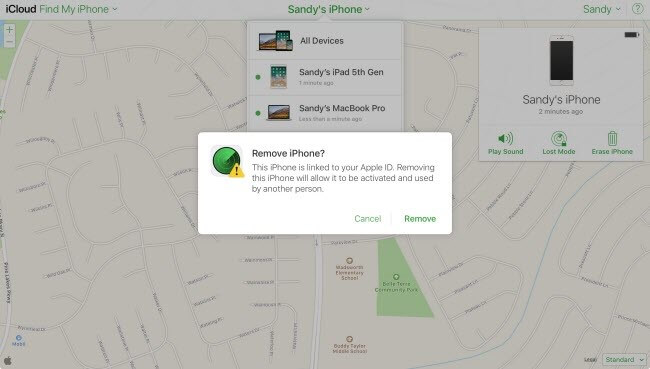
Step 3: Click on the “All Devices” option from the top. Select your Apple iPhone 11 Pro, which you want to remove by clicking on “Remove from account.”
Step 4: Once your device is removed from the account, a window will pop up asking you to delete the option of that device from your iCloud account. Now you may log in Find My iPhone with your iCloud account on another device.
Part 4: Turn off Find My iPhone using Recovery Mode
The recovery model of the Apple iPhone 11 Pro allows you to reset or restore your data. It also offers data cleaning and backing up of apps to keep your Apple iPhone 11 Pro updated and free of glitches. When your phone is lagging or not working properly, then you need to put it into Recovery Mode.
However, Recovery Mode can also be useful to turn off Find My iPhone on your device. Here are the steps that will guide you on how to turn off Find My iPhone on a broken phone using Recovery Mode.
Step 1: Connect your Apple iPhone 11 Pro to your computer via cable and wait for your computer to detect your device.
Step 2: As soon as your Apple iPhone 11 Pro is detected, open iTunes and force restart your phone to activate the Recovery Mode. Activating this mode is different for different models of iPhone.
- For iPhone 8 and the later: Press the Volume Down button and release is immediately. Then press the Volume Up button and release it immediately again. After that, press and hold the Power Button until you see the Apple logo.
- For iPhone 7 and 7+: Press the Power Button and Volume Down button at the same time and hold them until the Apple logo appears on your screen.
- For iPhone 6s, and Previous Models: Press and hold the Home Button and Power button concurrently until your Apple iPhone 11 Pro shows the Apple logo.
Once your Apple iPhone 11 Pro shows the Apple logo, it means the Recovery Mode is activated.
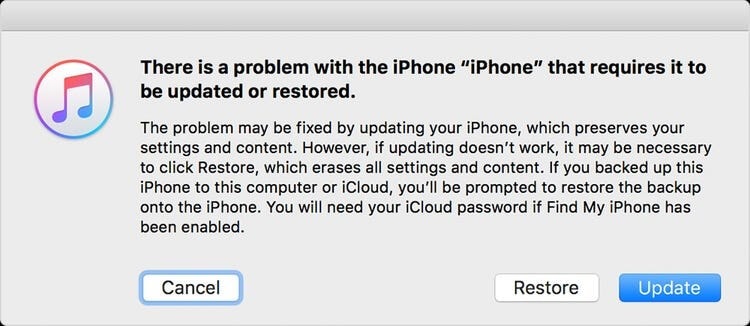
Step 3: Now click on “Restore” so iTunes can download software on your Apple iPhone 11 Pro. Once the process is completed, you can set up your Apple iPhone 11 Pro as new. This means your previous data will be erased, and Find My iPhone will be disabled automatically.
Conclusion
Now we’re done as we’ve provided you the best possible solutions to turn off Find My iPhone when your Apple iPhone 11 Pro is broken. It is obvious that it is a quite complicated process, but you have to be patient and follow the steps correctly to disable Find My Apple iPhone 11 Pro to avoid any inconvenience in the future. We hope this article answers all your queries regarding it.
How To Bypass the Required Apple Store Verification For Apple iPhone 11 Pro
The Apple App Store is a familiar place for anyone with an iPhone or iPad. It’s where you find all sorts of useful and fun apps. However, one thing that can be a hassle is the store’s strict verification process. Every time you make a purchase, you need to go through this step.
It’s there for a good reason – to stop fraud – but it can get annoying, especially if you forget your Apple ID or have other issues. This article will explore the ways to stop the Apple Store “Verification Required” prompt, making your app downloading experience smoother.

Part 1: Why Does Apple Require Verification in the Apple Store?
When browsing the App Store on your Apple iPhone 11 Pro or iPad and looking to download the latest game or productivity tool, you might have noticed that Apple often asks for some form of verification before you can proceed with your purchase. This is not just a random step; there’s a solid reason behind it.
The primary reason Apple requires verification for App Store purchases is to ensure that you are the person authorizing the purchase. This security measure prevents unauthorized transactions and protects your account from fraud.
What does this verification usually involve? It could be entering your Apple ID password or using Face ID or Touch ID if your device supports these features. These methods are designed to confirm your identity quickly and securely.

Reasons Why the Verification Required Message Might Appear
There are several reasons why you might see an Apple Store’ Verification Required’ message when trying to download an app or make a purchase:
- New Apple ID. If you’ve just created a new Apple ID and need to download or pay for apps, Apple must verify your payment information. Thus, you’ll have to prove everything, especially on a new phone.
- **Payment method needs to be corrected.**Suppose there’s an issue with your Apple ID’s payment method, such as outdated or incorrect details. In that case, verification is required to ensure the account is secure and ready for transactions.
- Invalid credit card. Unsupported or invalid credit cards can trigger the verification notice, as Apple can’t process payments with these cards.
- Unpaid balance. If there’s an outstanding balance on your Apple ID, you can download or pay for new apps once this balance is cleared.
- Family Sharing restrictions. For those using Family Sharing, if the family organizer has placed restrictions on your account, this could result in a verification prompt.
Understanding these reasons is the first step in addressing the ‘Verification Required’ message. It’s not just a random or annoying hurdle; it’s there for your security and to ensure a smooth, safe experience when using the App Store.
Part 2: How To Fix Verification Required Prompt Using Apple ID
Having to deal with the ‘Verification Required’ prompt in the App Store can be a bit of a hassle, especially when you’re eager to get your hands on a new app or game. Fortunately, there are several methods you can use to resolve this issue, most of which are pretty straightforward and can be done right from your device. Here’s how to tackle it:
Update Payment Method
One of the most common reasons for the verification prompt is a problem with your payment method. To fix this, go to your Apple ID settings on your Apple iPhone 11 Pro or iPad. Tap your name at the top of the Settings app, then go to Payment & Shipping. You can update your payment information or add a new payment method here. Make sure the details are correct and up to date.
Check Unpaid Subscriptions
Sometimes, unpaid subscriptions can trigger the verification prompt. Tap the App Store > your profile icon, and select Subscriptions. Here, you can view all your subscriptions, active or expired. Check if there are any unpaid ones and clear any outstanding payments.

Don’t Require Password for Purchases
For less frequent purchases, you should change the settings so you don’t always have to enter your password. Go to Settings, then to Screen Time. Under Content & Privacy Restrictions, select iTunes & App Store Purchases. Here, you can change the settings to Don’t Require for purchases. However, be cautious with this method as it reduces security.

Sign Out of Apple ID and Re-Sign In
Sometimes, simply signing out of your Apple ID and then signing back in can resolve the issue. Go to the Settings app, tap your name at the top, and scroll down to Sign Out. After signing out, restart your device and then sign back in. This can help refresh your account settings and clear up any minor glitches.
Remember, these methods are about bypassing the verification process and ensuring your account is up-to-date and secure. Regularly checking your Apple ID settings and payment information can prevent many common issues with the App Store, including the frustrating ‘Verification Required’ prompt.
Part 3: How To Bypass Verification Required Prompt Without Apple ID
If you need to learn how to bypass the ‘Verification Required’ prompt in the App Store but don’t have access to the Apple ID or password, there’s an alternative approach using third-party software. One such tool that can assist in this situation is Wondershare Dr.Fone - Screen Unlock (iOS), which offers a feature specifically designed for this purpose.
Introducing Dr. Fone’s Screen Unlock (iOS) Feature
Dr.Fone - Screen Unlock (iOS) function includes an Apple ID remover tool. This feature is handy when you cannot remember your Apple ID or password but need to download apps from the App Store. Here’s a step-by-step guide on how to use this feature.
Step-by-Step Guide To Bypass Verification Without Apple ID With Dr.Fone
Here’s a complete guide on bypassing the verification required on the App Store.
Step 1: Install and open Wondershare Dr.Fone on your computer.
Step 2: Navigate to Toolbox and select Screen Unlock followed by iOS.
- Step 3: In the next window, choose Remove Apple ID to proceed.

- Step 4: A connectivity status will appear on the screen with your iOS device connected to the computer. Click Unlock Now to start the process.

- Step 5: Confirm if your iOS device has a screen lock and two-factor authentication enabled. This is crucial for the process to continue smoothly.

- Step 6: Follow the on-screen instructions to put your iOS device in Recovery Mode. If necessary, you can also opt for DFU Mode by following the provided instructions. Once in Recovery Mode, the tool will recognize your device model. You’ll need to select the correct system version to proceed.

- Step 7: The tool will download the appropriate iOS firmware for your device. After the download, it will verify the firmware.

- Step 8: After firmware verification, click Unlock Now. You’ll be prompted to enter a code for confirmation. Once entered, the unlocking process will begin.

- Step 9: You’ll receive a notification once the process is complete. You may try again if the process fails to succeed the first time.

Note: After Apple ID removal, you must re-enter a new Apple ID to access the App Store. Take note of the password now if you forgot your previous one.
Conclusion
In this article, you’ve learned how to remove ‘Verification Required’ in the App Store. The primary takeaway is to try solving the issue using your Apple ID, as this approach typically prevents data loss. However, if you’re in a tight spot without access to your Apple ID, Dr.Fone - Screen Unlock (iOS) offers a reliable alternative to bypass this hurdle.
While it’s an effective solution, always consider it a secondary option to safeguard your data. Additionally, Dr.Fone can be a handy tool for various other phone-related challenges, making it a useful resource for tackling different tech problems.
Tips: Are you searching for a powerful Screen Unlock tool? No worries as Dr.Fone is here to help you. Download it and start a seamless unlock experience!
Also read:
- [New] In 2024, Get Unlimited Echoes for Online Content Makers
- [New] In 2024, Increase Viewership Swiftly - $5 Strategy Unveiled
- [Updated] Audio Recipe Converting Insta Vids to Mp3 for 2024
- A Comprehensive Walkthrough: Installing and Activating the Revo Uninstaller Mobile Application
- AMD Graphics Driver Update v24.10: Enhance Your Visual Experience
- How to Access Your iPhone 14 When You Forget the Passcode? | Dr.fone
- In 2024, Everything You Need To Know About Unlocked iPhone 15 | Dr.fone
- In 2024, Forgot Locked iPhone 13 Password? Learn the Best Methods To Unlock | Dr.fone
- In 2024, The Best Methods to Unlock the iPhone Locked to Owner for iPhone SE | Dr.fone
- In 2024, Things You Should Know When Unlocking Total Wireless Of iPhone 11 | Dr.fone
- Mac-Based Guide: Efficiently Converting and Compressing MKV Files Into 3GP Format
- Preventative Measures for Windows Date & Time Stability
- Solving Six Frequent Vehicle AI System Implementation Problems
- Title: Unlocking Apple iPhone 11 Pro Lock Screen 3 Foolproof Methods that Actually Work | Dr.fone
- Author: Amelia
- Created at : 2025-01-18 18:03:52
- Updated at : 2025-01-24 16:09:24
- Link: https://iphone-unlock.techidaily.com/unlocking-apple-iphone-11-pro-lock-screen-3-foolproof-methods-that-actually-work-drfone-by-drfone-ios/
- License: This work is licensed under CC BY-NC-SA 4.0.